Test Example Code
We have example code ready to go for these displays. It’s compatible with the Arduino Uno or Mega…but not other boards like the Leonardo, nor “Arduino-like” boards such as Netduino…programming gurus might be able to port it to other microcontrollers by adapting the C++ source, but as written it does some pretty low-level, non-portable things.
The library works with a LIMITED NUMBER of boards: Arduino Uno, Mega, Zero, Adafruit Metro M0 and Metro M4. Other boards (such as the Arduino Leonardo) ARE NOT SUPPORTED.
Two libraries need to be downloaded and installed: first is the RGB Matrix Panel library (this contains the low-level code specific to this device), and second is the Adafruit GFX Library (which handles graphics operations common to many displays we carry).
|
|
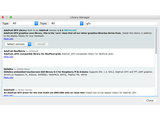
Both libraries can be found and installed using the Arduino Library Manager (Sketch→Include Library→Manage Libraries…). Search for “gfx” and “rgb matrix panel” and install the corresponding Adafruit libraries. |


Now you are ready to test! Open up the IDE and load File→Examples→RGBmatrixPanel→testcolors_16x32 (for the 16×32 panel) or File→Examples→RGBmatrixPanel→colorwheel_32x32 (for the 32×32 panel).
If using an Arduino Mega 2560, in addition to wiring changes previously mentioned, you’ll need to make a small change to each of the example sketches. This line:
Download: file
- #define CLK 8 // MUST be on PORTB! (Use pin 11 on Mega)
Should be changed to:
Download: file
- #define CLK 11
(Any of digital pins 10-13 and 50-53 can be used for this function on the Mega, with the corresponding wiring change. The examples all reference pin 11.)
If using an Adafruit Metro M4 (not M0 or 328), the CLK change would instead be:
Download: file
- #define CLK A4
After uploading, with the 16×32 panel you should see the following:

This is a test pattern that shows 512 colors (out of 4096) on the 512 pixels. Since there’s no really elegant way to show a 3-dimensional color space (R/G/B) in two dimensions, there’s just repeating grids of red/green with increasing blue. Anyways, this shows you the range of colors you can achieve!
or, with the 32×32 panel:

Now that you’ve got it working here are a few things to look for:
The most useful line to look at is:
Download: file
- matrix.drawPixel(x, y, matrix.Color333(r, g, b));
which is where we actually draw to the display. This code only draws one pixel at a time. The x and ycoordinates are the individual pixels of the display. (0,0) is in the top left corner, (31, 15) is in the bottom right (remember that we start counting at 0 here!). To create a color, you will want to use the helper funciton Color333 which will take three 3-bit numbers and combine them into a single packed integer. So for example, the first argument, r can range from 0 to 7. Likewise for gand b. To make a pixel that is pure red, r would be 7 and g, b would be 0. To make a white pixel, set all to 7. To make a black (off) pixel, set the colors to 0. A similar function, Color444, accepts three 4-bit numbers for up to 4096 colors.
Now we can open up the next example, which shows the rest of the library capabilities.