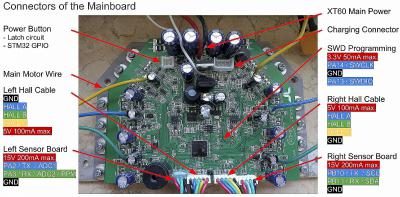
Этим опусом я начну и постараюсь довести до читателя полную структуру программы изменяющую гироскутер в любое иное изделие для нужд потребителя и вашей инженерной мысли.
Прежде всего хочу выразить благодарность за разработку а главное за выкладывание полной рабочей версии программы ссылка
если вы знаете английский напишите ему мое спасибо буду очень вам признателен 
ссылка
Что может программа:
1. Управление от RC передатчика ppm-sum в этом случае работают два колеса не зависимо друг от друга (вперед, назад, вправо и в лево).
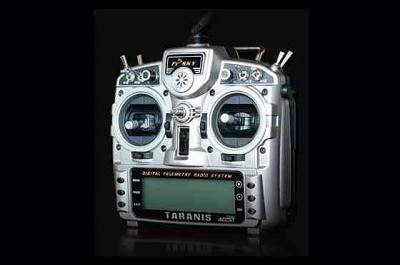
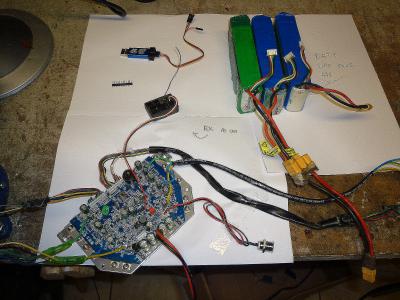
приемник подключается на прямую к контроллеру гироскутера.
2. Управление от джойстика необходим джойстик от видеоигры плейстейшен. (вперед,назад, вправо и в лево).
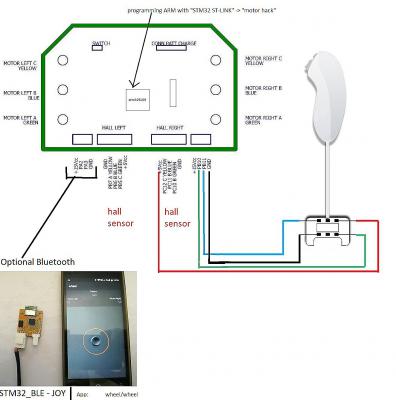
3. Управление переменным сопротивлением, вперед, назад и переключение скоростей информация предоставлена Viktor_7
ссылка

Подходит для самокатов и машинок можно ставить ограничение по скорости максимальная скорость 25 км час.
4. То что использую Я это управление arduino по протоколу uart.
5. Танковое управление от двух джойстиков организуется только при помощи двух контроллеров.
Выбирайте на ваше усмотрение.
Дальше больше 
Так как программа написана на языке С++ ее надо скомпилировать для так сказать волшебного превращения в прошивку для контроллера гироскутера.
рассмотрим настройку программы под свои проекты.
это файл в программе где вы делаете свои установки config.h
#pragma once
#include «stm32f1xx_hal.h»
// ############################### Менять данные запрещено 100% выход из строя контроллера ну или его не работа
#define PWM_FREQ 16000 // PWM частота 16 кГц
#define DEAD_TIME 32 // PWM deadtime
#define DELAY_IN_MAIN_LOOP 5 // in ms. default 5. it is independent of all the timing critical stuff. do not touch if you do not know what you are doing.
#define TIMEOUT 5 // number of wrong / missing input commands before emergency off
В верху шапка программы здесь менять ничего не рекомендуется
в низу само тело установки, рассмотрим его более детально.
// ############################### GENERAL ###############################
// How to calibrate: connect GND and RX of a 3.3v uart-usb adapter to the right sensor board cable (be careful not to use the red wire of the cable. 15v will destroye verything.). if you are using nunchuck, disable it temporarily. enable DEBUG_SERIAL_USART3 and DEBUG_SERIAL_ASCII use asearial terminal.
// Battery voltage calibration: connect power source. see <How to calibrate>. write value nr 5 to BAT_CALIB_ADC. make and flash firmware. then you can verify voltage on value 6 (devide it by 100.0 to get calibrated voltage).
#define BAT_CALIB_REAL_VOLTAGE 43.0 // установить напряжение измеренное тестером на вашем аккумуляторе (в данный момент используется 43 вольта)
#define BAT_CALIB_ADC 1704 // BAT_CALIB_ADC -это калибровочный коэффициент для расчёта напряжения, т.е. число 1704 — это количество
отсчётов, при подаче на вход делителя напряжения НАПРЯЖЕНИЯ = 43.0
#define BAT_NUMBER_OF_CELLS 10 // количество ячеек в аккумуляторе: 10s
#define BAT_LOW_LVL1_ENABLE 0 // вкл/выкл звука при низком напряжении, 1 or 0
#define BAT_LOW_LVL1 3.6 // пищит на этом уровне напряжения. [В/эл.]
#define BAT_LOW_LVL2_ENABLE 1 // to beep or not to beep, 1 or 0
#define BAT_LOW_LVL2 3.5 // your battery is almost empty. Charge now! [V/cell]
#define BAT_LOW_DEAD 3.37 // undervoltage poweroff. (while not driving) [V/cell]
#define DC_CUR_LIMIT 15 // DC current limit in amps per motor. so 15 means it will draw 30A out of your battery. it does not disable motors, it is a soft current limit.
// Board overheat detection: the sensor is inside the STM/GD chip. it is very inaccurate without calibration (up to 45В°C). so only enable this funcion after calibration! let your board cool down. see <How to calibrate>. get the real temp of the chip by thermo cam or another temp-sensor taped on top of the chip and write it to TEMP_CAL_LOW_DEG_C. write debug value 8 to TEMP_CAL_LOW_ADC. drive around to warm up the board. it should be at least 20В°C warmer. repeat it for the HIGH-values. enable warning and/or poweroff and make and flash firmware.
#define TEMP_CAL_LOW_ADC 1655 // temperature 1: ADC value
#define TEMP_CAL_LOW_DEG_C 35.8 // temperature 1: measured temperature [В°C]
#define TEMP_CAL_HIGH_ADC 1588 // temperature 2: ADC value
#define TEMP_CAL_HIGH_DEG_C 48.9 // temperature 2: measured temperature [В°C]
#define TEMP_WARNING_ENABLE 0 // to beep or not to beep, 1 or 0, DO NOT ACTIVITE WITHOUT CALIBRATION!
#define TEMP_WARNING 60 // annoying fast beeps [В°C]
#define TEMP_POWEROFF_ENABLE 0 // to poweroff or not to poweroff, 1 or 0, DO NOT ACTIVITE WITHOUT CALIBRATION!
#define TEMP_POWEROFF 65 // overheat poweroff. (while not driving) [В°C]
#define INACTIVITY_TIMEOUT 8 // установка времени отключения если вы не используете включено устройство
// ############################### LCD DEBUG ###############################
Здесь вы включаете или выключаете работу дисплея ( дисплей 128х64 i2c ssd1306 или 1602 i2c
выводит напряжение и обороты каждого колеса.
//#define DEBUG_I2C_LCD // standard 16×2 or larger text-lcd via i2c-converter on right sensor board cable
// ############################### UART протокол ###############################
#define DEBUG_SERIAL_USART3 // PB10,PB11 disable if I2C (nunchuck or lcd) is used!
#define DEBUG_BAUD 115200 // UART
//#define DEBUG_SERIAL_SERVOTERM
#define DEBUG_SERIAL_ASCII // «1:345 2:1337 3:0 4:0 5:0 6:0 7:0 8:0\r\n» сам протокол
// ############################### INPUT ###############################
// ###### CONTROL VIA UART (serial) ######
//#define CONTROL_SERIAL_USART2 // left sensor board cable, disable if ADC or PPM is used!
скорость передачи общения между контроллером и Ардуино
#define CONTROL_BAUD 19200 // control via usart from eg an Arduino or raspberry
эту строчку надо вписать в ваш скетч для управления ардуино.
// for Arduino, use void loop(void){ Serial.write((uint8_t *) &steer, sizeof(steer)); Serial.write((uint8_t *) &speed, sizeof(speed));delay(20); }
// ###### использование PPM-SUMM######
// left sensor board cable. Channel 1: steering, Channel 2: speed.
//#define CONTROL_PPM // use PPM-Sum as input. disable DEBUG_SERIAL_USART2!
//#define PPM_NUM_CHANNELS 6 // количество каналов
// ###### CONTROL VIA TWO POTENTIOMETERS ######
// ADC-calibration to cover the full poti-range: connect potis to left sensor board cable (0 to 3.3V) (do NOT use the red 15V wire in the cable!). see <How to calibrate>. turn the potis to minimum position, write value 1 to ADC1_MIN and value 2 to ADC2_MIN. turn to maximum position and repeat it for ADC?_MAX. make, flash and test it.
#define CONTROL_ADC // use ADC as input. disable DEBUG_SERIAL_USART2!
#define ADC1_MIN 0 // min ADC1-value while poti at minimum-position (0 — 4095)
#define ADC1_MAX 4095 // max ADC1-value while poti at maximum-position (0 — 4095)
#define ADC2_MIN 0 // min ADC2-value while poti at minimum-position (0 — 4095)
#define ADC2_MAX 4095 // max ADC2-value while poti at maximum-position (0 — 4095)
// ###### CONTROL VIA NINTENDO NUNCHUCK ######
// left sensor board cable. keep cable short, use shielded cable, use ferrits, stabalize voltage in nunchuck, use the right one of the 2 types of nunchucks, add i2c pullups. use original nunchuck. most clones does not work very well.
//#define CONTROL_NUNCHUCK // use nunchuck as input. disable DEBUG_SERIAL_USART3!
// ############################### DRIVING BEHAVIOR ###############################
// inputs:
// — cmd1 and cmd2: analog normalized input values. -1000 to 1000
// — button1 and button2: digital input values. 0 or 1
// — adc_buffer.l_tx2 and adc_buffer.l_rx2: unfiltered ADC values (you do not need them). 0 to 4095
// outputs:
// — speedR and speedL: normal driving -1000 to 1000
// — weakr and weakl: field weakening for extra boost at high speed (speedR > 700 and speedL > 700). 0 to ~400
#define FILTER 0.1 // lower value == softer filter. do not use values <0.01, you will get float precision issues.
#define SPEED_COEFFICIENT 0.5 // higher value == stronger. 0.0 to ~2.0?
#define STEER_COEFFICIENT 0.5 // higher value == stronger. if you do not want any steering, set it to 0.0; 0.0 to 1.0
#define INVERT_R_DIRECTION
#define INVERT_L_DIRECTION
#define BEEPS_BACKWARD 1 // 0 or 1
//Turbo boost at high speeds while button1 is pressed:
//#define ADDITIONAL_CODE \
if (button1 && speedR > 700) { /* field weakening at high speeds */ \
weakl = cmd1 — 700; /* weak should never exceed 400 or 450 MAX!! */ \
weakr = cmd1 — 700; } \
else { \
weakl = 0; \
weakr = 0; }
// ###### МАЛЕНЬКАЯ МАШИНКА ######
// for better bobbycar code see: ссылка
// #define FILTER 0.1
// #define SPEED_COEFFICIENT -1
// #define STEER_COEFFICIENT 0
// #define ADDITIONAL_CODE \
if (button1 && speedR < 300) { /* drive backwards */ \
speedR = speedR * -0.2f; \
speedL = speedL * -0.2f; } \
else { \
direction = 1; } \
if (button1 && speedR > 700) { /* field weakening at high speeds */ \
weakl = speedR — 600; /* weak should never exceed 400 or 450 MAX!! */ \
weakr = speedR — 600; } \
else { \
weakl = 0; \
weakr = 0; }
// ###### КРЕСЛО ######
// #define FILTER 0.05
// #define SPEED_COEFFICIENT 0.5
// #define STEER_COEFFICIENT -0.2
// #define ADDITIONAL_CODE if (button1 && scale > 0. { /* field weakening at high speeds */ \
weakl = speedL — 600; /* weak should never exceed 400 or 450 MAX!! */ \
weakr = speedR — 600; } \
else {\
weakl = 0;\
weakr = 0;
// ############################### VALIDATE SETTINGS ###############################
#if defined CONTROL_SERIAL_USART2 && defined CONTROL_ADC
#error CONTROL_ADC and CONTROL_SERIAL_USART2 not allowed. it is on the same cable.
#endif
#if defined CONTROL_SERIAL_USART2 && defined CONTROL_PPM
#error CONTROL_PPM and CONTROL_SERIAL_USART2 not allowed. it is on the same cable.
#endif
#if defined DEBUG_SERIAL_USART3 && defined CONTROL_NUNCHUCK
#error CONTROL_NUNCHUCK and DEBUG_SERIAL_USART3 not allowed. it is on the same cable.
#endif
#if defined DEBUG_SERIAL_USART3 && defined DEBUG_I2C_LCD
#error DEBUG_I2C_LCD and DEBUG_SERIAL_USART3 not allowed. it is on the same cable.
#endif
#if defined CONTROL_PPM && defined CONTROL_ADC && defined CONTROL_NUNCHUCK || defined CONTROL_PPM && defined CONTROL_ADC || defined CONTROL_ADC && defined CONTROL_NUNCHUCK || defined CONTROL_PPM && defined CONTROL_NUNCHUCK
#error only 1 input method allowed. use CONTROL_PPM or CONTROL_ADC or CONTROL_NUNCHUCK.
#endif
есть еще один файл установки main но он для продвинутых пользователей его я разберу позже.
забегу немного в перед эта прошивка ссылка работает с RPiZeroW платформа для робота.
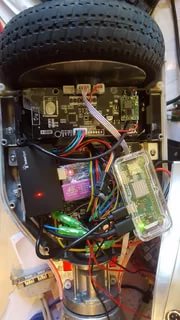
Пишите, спрашивайте что знаю то отвечу.
![]() 1ow004c.jpeg (290.12 кБ, 2000×1230 — просмотрено 21565 раз.)
1ow004c.jpeg (290.12 кБ, 2000×1230 — просмотрено 21565 раз.)
